Tip 1. The Kitchen Sink
By default the Visual Editor only shows a single row of buttons in the editor. Kitchen Sink is the last button in this row. Clicking on it will display another row of buttons with more buttons.
 
Tip 2. Master the Keyboard Shortcuts
It is annoying to move the mouse over just to make some text bold or add a link. The visual editor comes with a bunch of useful keyboard shortcuts for the most common formatting tasks.
Using keyboard shortcuts instead of mouse will not only save time but will also make writing easier for you. Check out our guide on the most time-saving keyboard shortcuts in Gridweb. 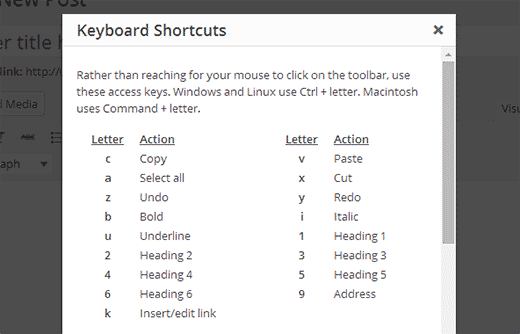
The following is a guide to keyboard shortcuts:
Gridweb Keyboard Shortcuts for Visual Post Editor
Gridweb comes with a slightly modified version of Tiny MCE editor. It appears on the Visual tab in your Gridweb post editor. It is a rich text editor with formatting buttons much like MS Office. Many beginner level users use their mouse to access these formatting and styling buttons on the editor. Using keyboard shortcuts you can rest your hands on keyboard and edit posts quicker. Mac users can use Command key instead of Ctrl.
- Ctrl + b = Bold
- Ctrl + i = Italic
- Ctrl + c = Copy
- Ctrl + v = Paste
- Ctrl + x = Cut
- Ctrl + a = Select All
- Ctrl + z = Undo
- Ctrl + y = Redo
- Ctrl + [number] = Insert heading sizes, e.g. CTRL+1 = <h1>, CTRL+2 = <h2>.
- Alt + Shift + n = Check Spelling
- Alt + Shift + l = Align Left
- Alt + Shift + j = Justify Text
- Alt + Shift + c = Align Center
- Alt + Shift + d = Strikethrough
- Alt + Shift + r = Align Right
- Alt + Shift + u = Unordered List
- Alt + Shift + a = Insert link
- Alt + Shift + o = Numeric List
- Alt + Shift + s = Remove link
- Alt + Shift + q = Quote
- Alt + Shift + m = Insert Image
- Alt + Shift + w = Full screen distraction free writing mode
- Alt + Shift + t = Insert More Tag
- Alt + Shift + p = Insert Page Break tag
- Alt + Shift + h = Rich text editor help
Gridweb Keyboard Shortcuts for Plain Text Editor
Plain text editor is a simple text editor that appears on your post editor under the Text tab. It has some very basic formatting buttons and you can see all the html in the editor. There are just a few shortcuts for plain text editor in Gridweb.
- Ctrl + c = Copy
- Ctrl + v = Paste
- Ctrl + x = Cut
- Ctrl + z = Undo
- Ctrl + y = Redo
- Ctrl + p = Print
- Alt + Shift + p = Publish
- Alt + Shift + f = Fullscreen distraction free writing
Gridweb Keyboard Shortcuts for Comments Screen
If you receive a lot of comments then you can moderate comments quickly using keyboard shortcuts for comment management. However these shortcuts are not enabled by default. To enable these keyboard shortcuts you need to go to Users » Your Profile and check Keyboard Shortcuts check box. Save your profile and go back to comments screen in admin area. The available shortcuts are:
- J = Next comment (moves the current selection down)
- K = Previous comment (moves the current selection up)
- A = Approve comment
- U = Unapprove comment
- D = Delete comment
- R = Reply comment
- Q = Quick edit a comment
- Z = Restore Comment from Trash or Undo if you Delete a comment
To select multiple comments press X to check the selected comment and press J orK keys to move to next or previous comment. Once you have selected multiple comments, you can use these keyboard shortcuts to perform bulk actions:
- Shift + A = Approve checked comments
- Shift + D = Delete checked comments
- Shift + U = Unapprove selected comments
- Shift + T = Move selected comments to trash
- Shift + Z = Restore selected comments from trash
It might take you a while to get used to using keyboard shortcuts instead of mouse or touchpad. However in the long run, it will definitely speed up the process and help you save time.
Did you know about these Gridweb keyboard shortcuts? Do you use them? If not, then why? Let us know by leaving a comment below.
Tip 3. Single and Double Line Spacing
Many beginner level users often find it difficult to figure out how to create paragraphs and line breaks in Gridweb. To add a new paragraph in the visual editor you need to press the Enter key. Gridweb will add a new paragraph with double line spacing.
If you would like to just enter a line break with single line spacing, then you need to press Shift + Enter keys together.
The following is a guide on how to add various line spacing:
Adding Double Line Space
When you press Enter to add a line break, Gridweb visual editor considers it as a new paragraph. This means that it will automatically add double line space granted that your theme has the styling for it (most good themes do).
So simply go in and press Enter after the line and then type something else in the next line.
 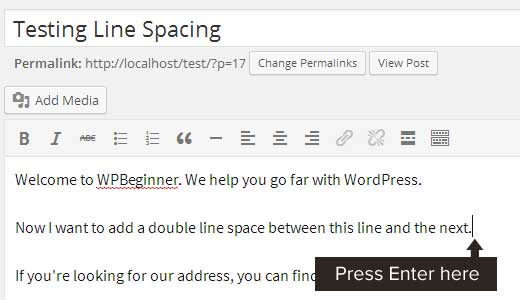
By simply doing that, based on your theme styling, you should see a clear distinction between paragraphs (i.e double line spacing).
 
Adding Single Line Space
Now if you are writing something like an address, then you probably want it to be single spaced instead of double spaced.
 
In this case, you need to press SHIFT + ENTER key.
This will tell Gridweb that you want to start a new line inside an existing paragraph thus it needs single line spacing vs double line spacing.
Modifying the Line height and Spacing
Sometimes even when you add the proper line spacing in the editor, it doesn’t display the way you want it to in your theme. This is when you need to make CSS changes. CSS is basically like the formatting feature in Microsoft Word.
Yes you will tweak a little bit of CSS code, but it’s not as scary as you think it is.
Open your theme’s CSS file. You can find it by going to Appearance » Editor in your Gridweb admin area. You can also use FTP as well if you like.
In your CSS file, you want to look for .post p
This basically controls the display of paragraphs in your post content. Once you find it, you need to add or modify the line-height value. If you do not find the .post p tag, then simply create one.
|
1 |
.post p{line-height:Â 1.5em;} |
The CSS rule shown above will change the line spacing of paragraph content to 1.5em. Em is a unit of width for typography. We are using .post class which Gridweb automatically adds to the content area of all posts to make sure it only affects posts and not paragraphs used elsewhere.
Now this only changes the spacing of single spacing. If you want to change the spacing between each paragraph (i.e double spacing), then you would need to add padding.
|
1 |
.post p { |
|
|
2 |
line-height:Â 1.5em; |
|
Â
|
3 |
padding-bottom:Â 15px; |
|
|
4 |
} |
|
Feel free to adjust the numbers to meet your needs.
Tip 4. Rearrange the Post Editor Screen
The post editor screen in Gridweb does not just have the post editor. It has other sections (known as metaboxes) for many other things such as categories, author, custom fields etc. When writing posts, you probably only use a few of these boxes and rest of them are just sitting there.
A clutter free writing area helps focusing and get more things done. Luckily, Gridweb allows you to show and hide items from post edit screen. You can even rearrange them to your own liking.Â
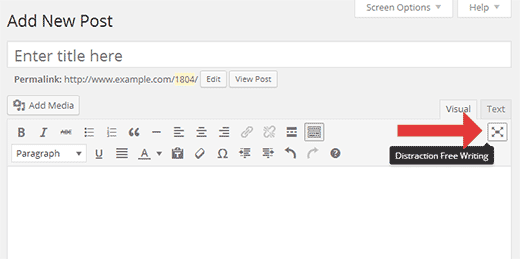
Tip 5. Using Distraction Free or Full Screen Writing Mode
 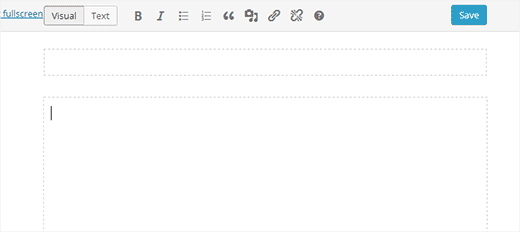
There are times when you need to just focus on writing without any user interface distractions. Gridweb comes with a full screen writing mode which offers a distraction free editor. Just click on the full screen button, and your post edit screen will transform into a full screen editor.
Tip 6. Changing Font Size in Gridweb Visual Editor
We understand that typography plays a very important role in web content. You may want to use different font sizes to grab your audience’s attention or highlight different sections in a lengthy article.
By default, Gridweb visual editor allows you to change the font size into paragraph text, headings, etc. The following is a guide on how to change font sizes:
Most of the time people want a bigger font size to grab attention of their readers specially for the heading elements. When writing the post content, you can use different heading sizes. In the visual editor mode, you can see all the available items under the tab called “Paragraph†as shown in the screenshot below:

These sizes are controlled by your theme’s stylesheet file (style.css) to make sure that the font size is coherent with everything. In most cases, one of the heading sizes should get the job done. Also, there are noted SEO benefits for using heading tags to emphasize main keywords i.e headings.
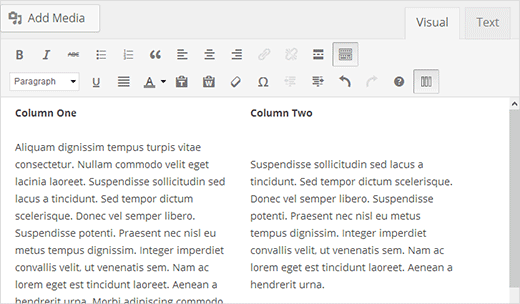
Tip 7. How to Add Columns in Gridweb Post Editor
Gridweb post editor does not come with a default solution to add multi column content in a post or a page. However you can add multi-column content by switching to Text mode and write the HTML to create columns. Ofcourse that’s not the easiest way to do it.
 Â
Â
Tip 8. Creating Tables in Gridweb Posts
Another thing missing from the default Gridweb post editor is a button to create tables. Sometimes you may need to insert data tables in Gridweb posts.
One way to add tables in Gridweb is by using some online table generator, but these tables are not pretty. Luckily there is an easier way to add tables in Gridweb posts directly from the post editor. The following is a guide on how to add tables to Gridweb:
First thing you need to do is install and activate TablePress plugin. Once activated, the plugin adds a TablePress menu item in your Gridweb admin.

To create a new table click on Add New Table. This will take you to Add New tab. After giving your table a name and description, choose the number of rows and columns you need. Don’t worry, you can always add/remove columns and rows from your table when entering data or by editing the table later. Click Add Tablebutton when you are done.

Now you will reach Edit Table screen. This is the table editor where you can add data to your table. You can also add and remove columns or rows. All rows and columns can be dragged and rearranged. Once you have created the table, it is time to add this table into a post.
Open an existing post or create a new post to enter the table. If you are using the visual editor, then you will see the tables icon in your visual editor. Pressing the button will open a pop up showing your tables. Press Insert Shortcode button next to the table you want, and it will add a shortcode to your post.

If you do not use the visual editor, then you can simply insert the shortcode manually. Click on the TablePress menu item, and it will show you the list of tables you have created. Take your mouse over to the table you want to add. Click on Show Shortcode, and this will open a pop-up window with the table shortcode. Copy the shortcode and paste it in your post wherever you want to insert the table.

That’s it. It is this easy to create and add tables in your Gridweb posts. You don’t have to write a single line of HTML or CSS. If you want to customize the look and feel of the table, then there is an option for that (you would need to customize the CSS for this part).
Tip 9. How to Add YouTube Videos in Gridweb Post Editor
You should never upload your videos to Gridweb. Instead you should use a video hosting service like Vimeo or YouTube to share your video content.
First you would need to upload your video to YouTube (or Vimeo), and then simply paste your video URL in the post editor. The following are instructions on how to add videos to Gridweb:
All you need to do is paste the video URL into the content area. All you need to make sure is that the URL is in it’s own line and not clickable (hyperlinked). For example:
Here is how you can add Post Thumbnails in Gridweb:
http://www.youtube.com/watch?v=ID
Wasn’t that super easy.
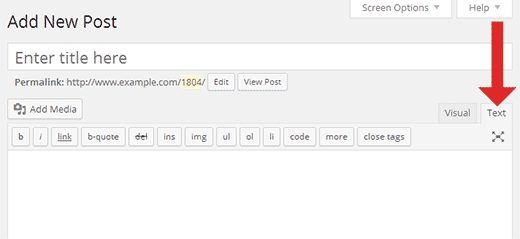
Tip 10. Switch to HTML Editor
While the visual editor is great for its ease of use, keyboard shortcuts, and visual appearance, don’t underestimate the power of the text editor. Sometimes when you are struggling with image alignment issues or the editor not allowing you to start a new line after adding an image, switching to HTML editor is the fastest solution. Just click on the Text tab on the editor and continue writing.
Tip 11. Adding Buttons Without Using Shortcodes
There are many Gridweb plugins that allow you to add beautiful call to action buttons in Gridweb using shortcodes. The problem is that your button is not instantly visible in the editor.
What if we told you that you can add buttons and see them exactly as they would look in your Gridweb post or pages? The following is instructions on how to add buttons to Gridweb without using shortcodes:
First thing you need to do is install and activate the Forget About Shortcode Buttons plugin.
Once you have activated the plugin, simply create a new post or edit an existing one, and you will see a new button in the Visual Editor labeled Insert Button.

To insert a new button in your post, you need to click on the Insert Button. This will bring up a popup window where you can design your new button.

All you need to do is add your button text and URL, and then choose text and background colors. After that click on the Type drop down menu to choose button style. You can also choose the button size from extra small to extra large.
If you click on the Icons tab, then you will be able to see the icons that you can add before or after the text in your buttons. These are icons are actually icon fonts.

During the process, you will be able to see a live preview of your button. Once you are satisfied with the look, simply click on Insert.
You will be able to see your button as it would appear in your post, right inside the post editor. You can simply select the button text and use the align icon in the editor to align it to the center, left, or right. Double clicking on the button will bring up the Insert Button popup, and you can re-edit your button if you like.
Tip 12. Check Spelling and Grammar Mistakes
Spelling mistakes and grammar blunders are very common. Editing your own articles is tough and sometimes you just can’t correct all the mistakes by simply re-reading your articles.
Luckily there is a simple solution to overcome this problem. The following are instructions on how to add a spellcheck button to the Gridweb:
First thing you need to do is install and activate the TinyMCE Spellcheck plugin. Upon activation, you need to go to Users » Your Profile to configure the plugin settings.

Start by looking under the proofreading section. There you can enable the plugin to automatically check post/page content when it is published or updated. You can also set checks for grammar and style rules. We recommend checking complex phrases, double negatives, phrases to avoid, and passive voice. Once you are done, simply click on Update Profile button to save your changes.
Now when writing a post, you will notice a new spell-check or proofread button in the post editor. When you click on this button, it will run a proofreading check on the content using the rules you set earlier.

Â
Tip 13. Paste as Plain Text
If you paste some content copied from some other web page, TinyMCE will copy the formatting style of the text. To solve this problem you need to press the Paste As Text button in visual editor before pasting your text.
 
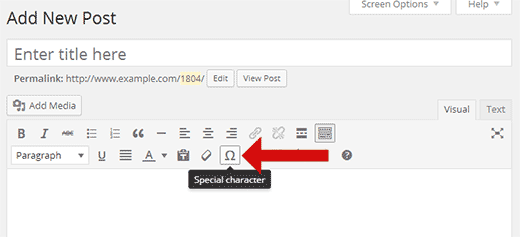
Tip 14: Adding Special Characters
Sometimes you may need to add a copyright, registered and trademark signs in your posts. The easiest way to add these and many other characters is by using the Special Characters button in the post editor.
Simply press the button and a popup containing special characters will appear. Click on the special character you need, and it will appear in the post editor.
We hope these tips helped you master the Gridweb visual editor.
